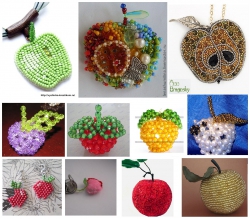
Three-dimensional apples
Below is a diagram of weaving an apple based on four beads. To easily weave such a round fruit, it is necessary to master the technique of weaving fullerene. When you train, then this work for you will be very simple.
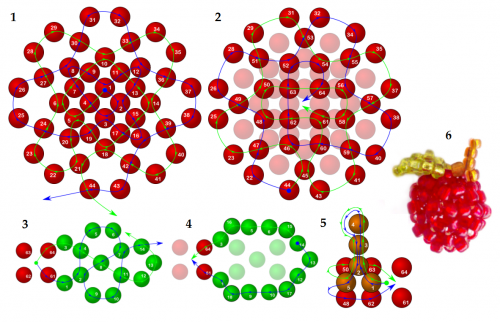
A few more options for apples, but already on five beads. In the circuit of Fig. 1 shows the lower half of the apple, the circuit of Fig. 2 is the upper half of the apple. The leaf can be made quite simple, as in the diagram, or more interesting, as in the examples.

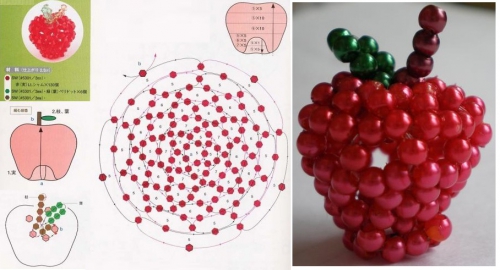
This scheme below is practically the same as the previous one, but it may be easier for you to weave a three-dimensional apple. It can also be an orange, Bulgarian pepper and other fruits and vegetables that have a similar shape.
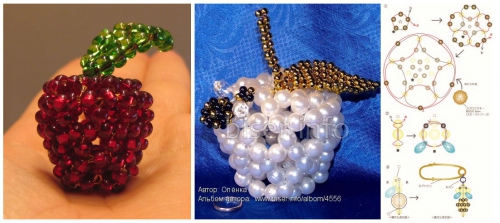
And finally the last scheme, but not the block, but the bee that sits on a white apple. Maybe you want to supplement your work with such a miniature insect. All the photos I collected on the pages of various sites in order that you had a maximum of examples for creativity.
Flat apple /
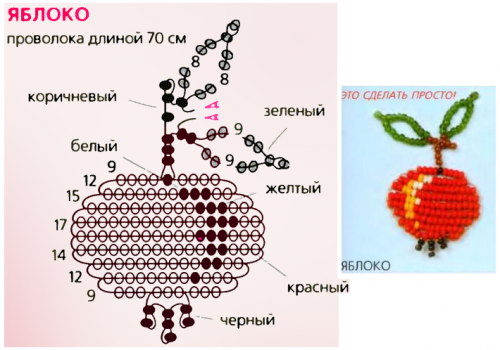
Below is a scheme of weaving an apple with parallel technique.
One of the simplest techniques of weaving, with which many begin. You can start the weaving from the bottom row by typing 9 beads of red color on the wire, then dial 3 red, 1 yellow and 8 red, then pass the second end of the wire through this row and tighten. so you should have two parallel rows. So move up the scheme. The knife with the leaves is weaved in the end, and also the black antennae below.
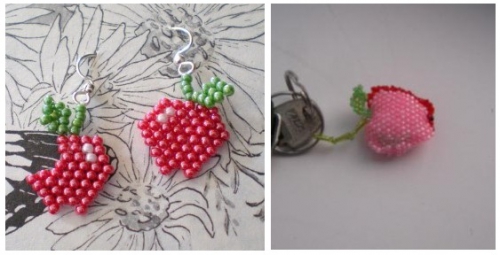
Considercute earrings apples in the photo below on the left.
You can weave without a scheme for the finished product and the technique of a brick stitch, start with the central widest row, which is horizontal. Weave the decreasing rows down, and afterwards upwards. The leaf can be weaved separately and sew it.
In the photo on the right is also a very pretty apple.
It is woven by a mosaic netting. we begin as usual from the center. Divide the apple in half and spin vertically, first the left half, and then the right one with the red barrel. Make two identical pieces of apple, sew and stuff with cotton.
Here's a great example of how to mesh an apple: " Three schemes
are shown below ,they can be embroidered with beads, can be weaved on the machine for weaving, or by hand weaving.
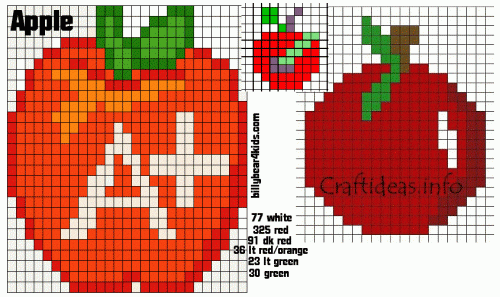
The scheme for embroidery with beads:
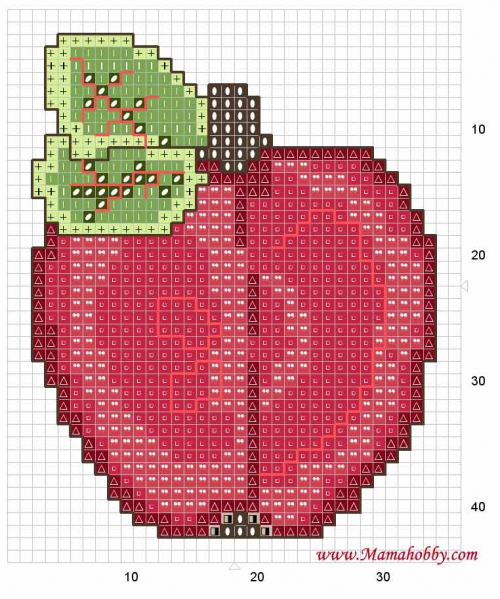
In general, this scheme is designed for the cross, but it can be remade and under the beads.
The same scheme for embroidery with beads:
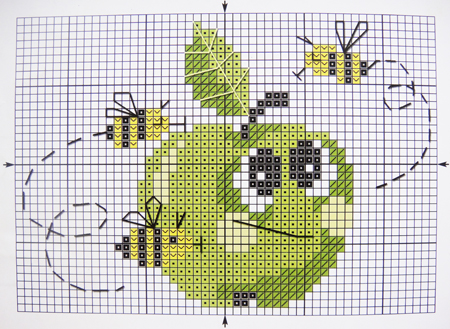
Apples from wire.
Just quite interesting apples can come from wire and beads. It is necessary to make a wireframe in the shape of an apple from a thick wire and wind it with a thin wire with the addition of beads. There is an option below in the diagram using standard wire for weaving.
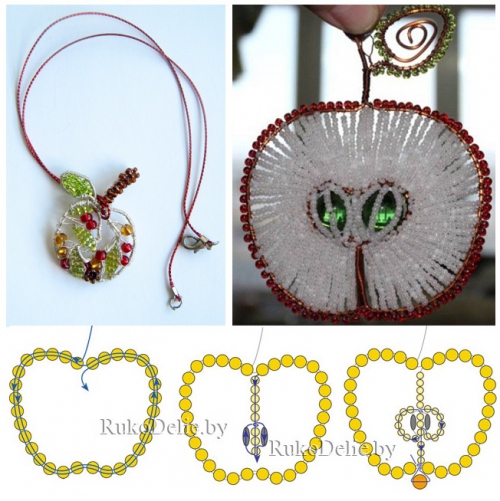
Embroidery of apples with beads.
Perfectly obtained apples embroidered with beads and beads. So you can make a brooch or pendant. To do this, you need to cut out the template in the form of a desired apple and work on the example "Brooch Heart", this visual MC will answer all your questions.
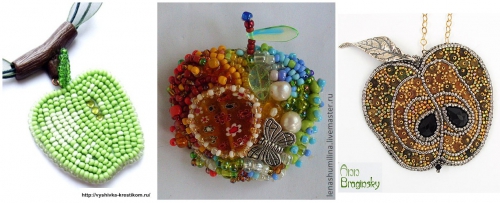
Decorative apples.
For such apples it is necessary to have a base in the form of an apple, which you will glue with beads with beads. The basis can be made in the papier mache machinery itself, as well as a foam plastic mold. It is possible and wooden. Of course, the glue on which you will glue the beads will depend on this.
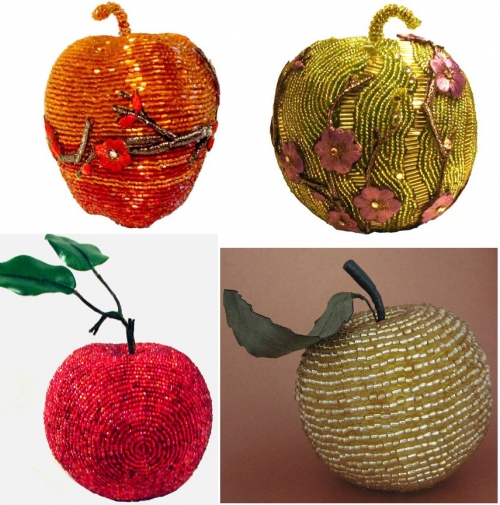
The pouring apple.
And the final work is done in parallel weaving. The rhombs are braided, as seen in the finished work and sewed together. Work better on the wire and apply wedges to the base. The basis can be an ordinary plastic apple or any other you found.
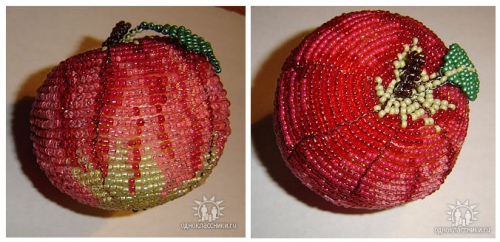
Green apple stub of beads.
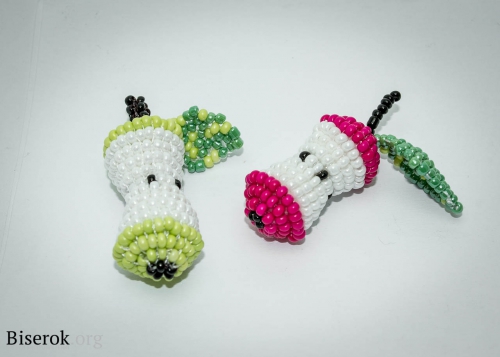
Necessary materials:
- White seed beads №10
- Black seed beads №10
- Beads lime №10
- Beads green №10
- Beads black №10
- Thread
- needle № 12
Master-class of weaving:
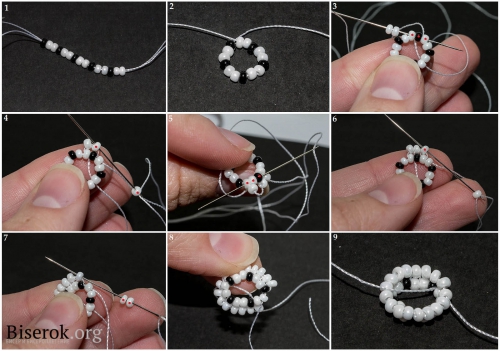
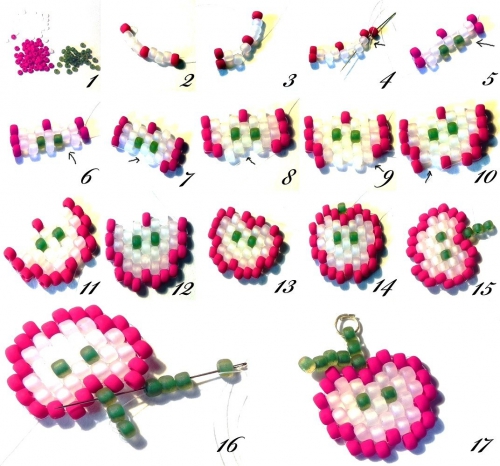
1. The first time I wove on a silk thread. The downside is that it was quite thick and often I could not go through the bead for the third or fourth time. Dial white and black beads alternating it (Fig. 1).
2. Close the ring and begin the weaving with the long end of the thread.
3. We collect 2 white beads and pass through three beads of the base as shown in Fig. 3.
4. Tighten. You got two beads of the second row. Now dial 1 bead and go through the edge bead (Figure 4).
5-6. We return back through three beads of the first row. Tighten. Continue the braiding in this way.
Now we need to make an addition. I did it in two places, dividing the circle into two halves, adding approximately and by eye.
7. To add, you need to dial 2 beads instead of one and weave them as usual with hand weaving.
8-9. When you are already approaching the end of the row, again add beads. So we twisted the second row.
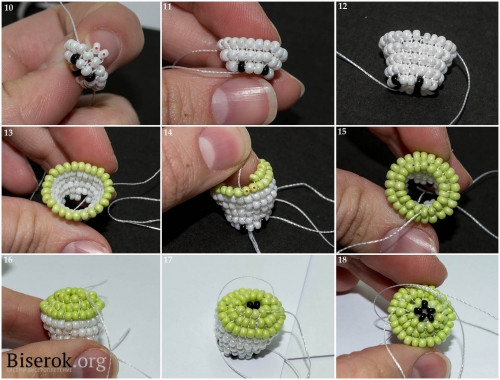
10-11. We begin the weaving of the third row. In it, I did just 2 additions of beads.
12. In the fourth and fifth row, there were three additions in three places of weaving. Divide the visual portion of the sodium portion and add between them. At this weaving the white pulp of one half is ready.
13. Begin to weave a row of salad beads. I wove it without additions.
14-15. The second row of salad beads should already go with decreasing. To do this, you need to go through two beads (Fig. 14), dial 1 bead and weave as usual. In this way, repeat the reduction after every two stitches. Then the decrease will be smooth.
16. The third row of salad beads already comes with a constant decrease, every two beads of the previous row are weaved by one new and are tightened.
17-18. We finish the work with five black beads. This we will have the bottom of the stub.
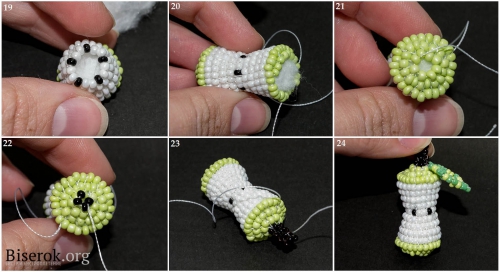
19. Now you need to stuff half of the apple with cotton so that it keeps the shape.
20-21. Next, repeat the weaving of the white pulp in exactly the same way as in point 3-16. Again, fill the apple with cotton.
22-23. And now we need to weave a leg. In this case, I woven a short flagellus on the basis of four beads by the same weaving. Since the threads I had were white, I filled them with a black marker under the color of the beads.
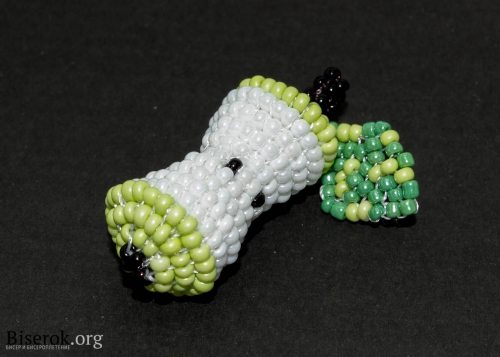
The leaf was woven with a mosaic weave, well, I got this stub for the first time. And considering all the moments, I decided to do one more, but to give another form and refine the shortcomings with the minuses.
A little wait and after a couple of hours I will finish the continuation of this MK. I wish everyone creative inspiration and a lot of free time!
Author master-class: Pyankova Svetlana.
A piece of red apple.
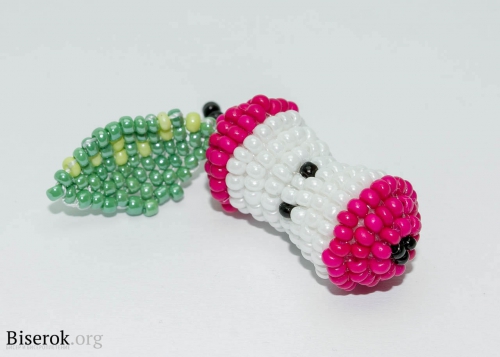
The second master class is weaving the apple stump.
This stub differs not only in the color of the beads, but also in size. It is shorter by two rows, the leg is different, the leaf and the shape are worked out according to another scheme. Maybe you will like this option, since I like a lot!
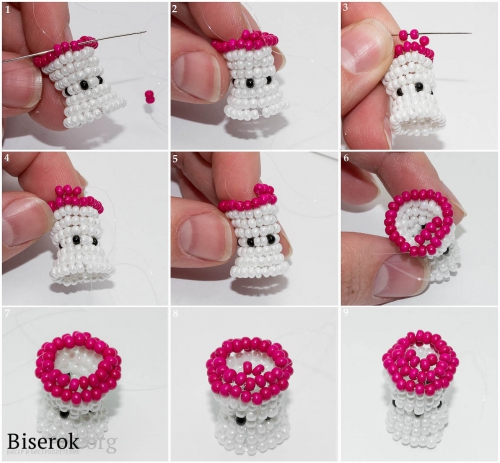
1. So, we begin the weaving and exactly repeat the first row of weaving a green apple. But the second row is already different in that you need to do just one addition, not two. The third row is already woven with two additions in two places, and the third with three. Here such an idle scheme of additions. The fourth row is already pink. We shave it as usual and with three additions.
I decided to show once again how the beads are going down in the ranks, as this pink apple is different from green. Here the reduction goes through time. One bead is weaved as usual, and the second is already grabbing two beads of the previous row of Fig. 1-2. We tighten it.
2-4. We collect 1 bead and pass through two newly dialed in the opposite direction we pass through (Figure 3). And we return back along the bottom row and go outside (Figure 4). We tighten it.
5-7. Thus we see how the weaving is narrowing. Repeat the weave with a decrease to the end of the row.
8-9. The third row of pink beads I wove with a constant decrease, each time grabbing two beads and threading just one new one.
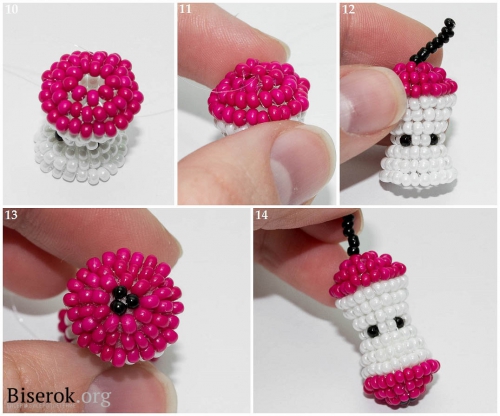
10-11. Monofilament is transparent and thin, which makes it possible to weave more carefully. It remains to complete the top of the apple, cutting this row to three beads.
12. Fill the mold with cotton. Attach a regular leg of black beads. You need to fix the unwanted thread like this. Make two nodules and pass the thread through the weave in any direction, cut the thread. Thus, the tip is hidden and securely fastened.
13. The bottom part of the apple I wove in general is very smooth and clear, because I already gained experience in the course of work. Finished with three black beads (Figure 13).
Weaving of a green
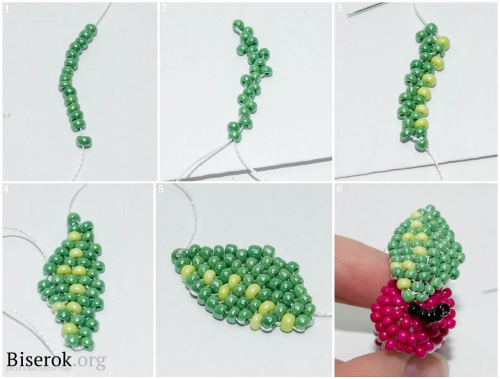
leaf The leaf is woven in a mosaic technique of weaving. I did it by eye, just typed green beads on the thread (Figure 1) and weaved with a decrease in the rows. The second row (Figure 2), usually it is always so "twisted", so do not pay attention, the third will be more obedient.
The third row (Figure 3), I added juicy colors with the help of salad beads.
The half of the leaf is ready (Fig. 4). If we weave on the line, then it will not be visible, in contrast to the thread. Go through the strings of the leaf beads and lead it to the other side to weave the second half of the leaf. When the sheet is ready, sew it to the apple.

I want to draw your attention to the fact that in these works I used only Chinese beads. It is not necessary to take expensive Japanese to get a good job, just simply work neatly and put off uneven beads and excellent in size to the side. This curve beads can also come in handy, but not for such techniques as weaving, mosaics and bricks.
That's all. Now these apples can be attached like a pendant, earrings, charms or an accessory to various bags, phones, flash drives, ears and so on.


No comments:
Post a Comment