Tuesday, January 16, 2018

DRESS, BEANIE FOR GIRLS

9:32:00 AM


subsequently changing the image mood.

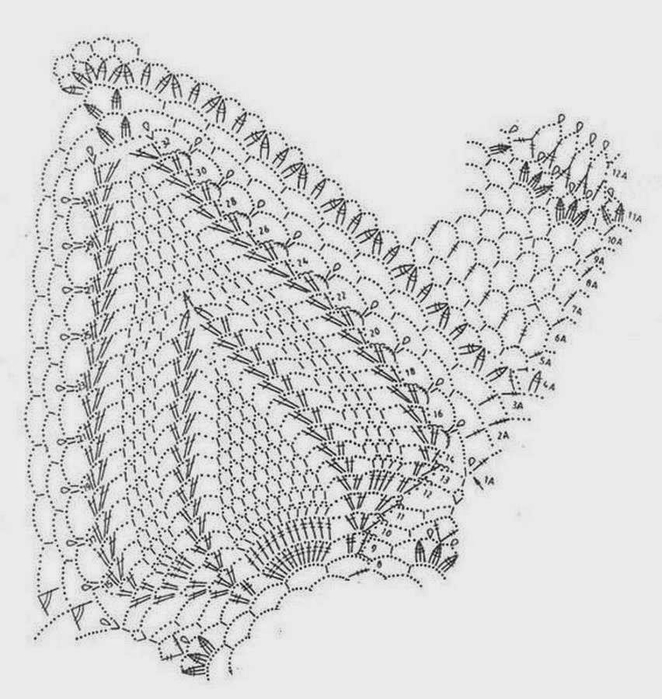
Wings initial knitting scheme,


later also changing under his view.


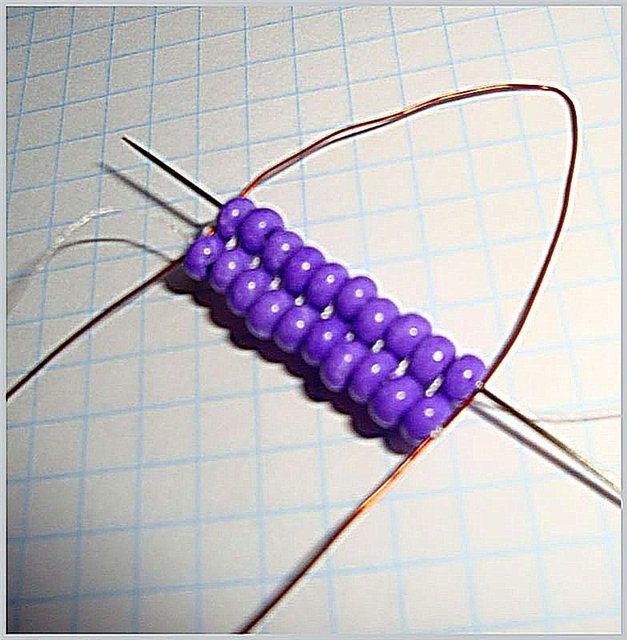
Take a photo on it, you can also knit (it's almost too schematic, the last time received a lot of questions, how I was knitting them).

Hem


Material: 100% cotton, thread spools, slightly thicker than the thickness of the iris, it took 210 grams.

Flower related scheme


BEANIE CROCHET


Cap with daylilies - SCHEME, DESCRIPTION, IDEAS
cap lily
 cap lily pattern stars

 
Cap columns associated with nakida the rear half-loop and elastic bars without nakida.
Size 48-50
Material used: Yarn begonia YarnArt 169m / 50g, hook 1.5, leather cord stamens.
Yarn consumption: 1 motochek base color and a quarter white.

From the author of this masterpiece:
The gum importantly, to the number of rows is a multiple of 12 (it later to get 12 ubavok)
Sama cap is connected to the columns nakida the rear half-loop.
Calculation made as well as on the cap from the top down.
in the exhaust gas of 48 cm diameter pancake 14 cm
pancake divide in half, I have 7 cm turned out, the depth of the exhaust gas caps: 3 + 2 cm I 18 cm.
Now 18 take away 7 cm = 11 cm - is to knit without ubavok, and then diminish - provyazyvat with Article 10 and 11. (Article 132 is 12 wedges 11 Article 1 wedge) 


Knit hat with a lily

Knit hat with a lily

Knit hat with a lily


Petal scheme:

Assign 6 petals under this scheme. 5 rows of white thread, six blue, and all in a circle to tie polustolbikami the rear half-loop. at the end of each row to connect between a pitch.

The stamens are made of leather cord 
Knit hat with a lily


here in this description can be associated cap


Elastic columns without nakida.

If conventional knit columns without nakida back for a slice, then the result is a flexible fabric with horizontal stripes in relief. If you want to get a vertical "gum" in this manner, it is necessary to knit across the product.
The gum importantly, to the number of rows is a multiple of 12 (it later to get 12 ubavok)


Column without nakida the rear slice


calculate the diameter of the bottom of a

very simple. To determine the diameter of the bottom of the math we need to remember. The girth of the head (the circle) divided by pi (3.14) and take 1-1.5 cm. It will be necessary diameter of the circle of our caps, after which we stop making allowances and knit vertically. But in order to better cap lay on the head, many masters recommend the last two series, required to achieve the desired diameter, alternate with rows of increases without.

For example. We knit columns with nakida product. One number - about 1 cm In other words, for each series of our product adds 2 cm The required diameter - 13 cm When the diameter of the circle is 9 cm, we begin to alternate rows:... 1 provyazyvaem without of increases, 1 increments, then again without of increases and again increments. Then we begin to knit straight to desired length. But once the conversation turned to the length, try it and calculate.

Length

In this case, do without complex numbers. Mathematics for the third class. The girth of the head just need to be divided into three. If we have a cap-skullcap barely reach the ears of increases do not do at all. If the cap to the middle ear, add 1.5-2 cm, your ears must be closed completely, the growth is 3 cm.

The first time exhibited on-line and if something is not written correctly, help fix it.


For myself, I have made a preliminary calculation. Knit 4 rows of CLOs and measured. calculated the number of rows of 1 cm. From the height of the height of the gum caps deducted and counted how many I need to knit rows CCH (I got 16 rows). Considered ubavki number of loops is divided into 12 wedges. I came out of 8.5 n (wedges I smashed at 8p, 9s, 8P, 9P, etc.) means ubavok 9 rows and 2 plus a number of smoothing for the best landing I have this number 7, a second smoothing number I did not do t. To. I have just been ubavok 6 9 row happened (I subtract in wedges where 9 p.). On the leaf numbered resulting number of rows and painted them as if I was knitting from the top down. It looked like this: 1p-12 CLO CLO 2p 24, 3p-36 CLO CLO 4p-48 and so on until the 7 series, 7 P-84 CLO CLO 84-8p, 9p-96 CLO CLO 10r- 102 ... 16r- 102 CCH. Ubavki did CCH 2 with one vertex.

SPRING DAFFODILS. BEADS, MK

4:27:00 AM


afd5f0360500 (636x640, 100Kb)

To work required:
- Beads (preferably transparent, but can be any) 1 faceted bead
- 0.4 mm wire, scissors and pliers
- monofilament, thread floss, PVA glue, a cocktail stick.

Could not remove anything on your beads and monofilament, therefore, for clarity, take a thick wire, monstrous beads and sewn with white thread to all ...

To begin with we take a piece of wire and bend the loop. At one end of the tie thread and recruit the required number of beads. The thread passes under the wire, encircles it and passes through a series of bead in the opposite direction, once more the number of pass through, going around to the wire beads tightly held in a wire frame. This is the first series.
be0a95a93416 (623x640, 80Kb)
The most uncomfortable place in all work - the second row, has not yet fixed the beads swinging.
Needle OVER wire just one pass Biserko, what would it start to sew the second row.
Gaining Biserko and pass through the first to the second. Gaining Biserko and pass through the second to the third, etc.
14e4c13c4a82 (611x640, 100Kb)
... that somehow I prefer to sew "away" ... but that does not necessarily ...
Thus, this manual weaving, go through the whole series. The output of the needle OVER wire. Turn the wire loop that circles the wire thread and pass through a series again rotated and repeated passage of the thread through the bead row, pulling the beads to the wire.
65ee5cc3b662 (627x640, 80Kb)
Bates beads replacement biserok 2 to 1 or 3 to 2.
3d04539bb412 (631x640, 106Kb)
Here is the number, stitched with the replacement of 3 to 2. He shifted on-Biserka floor, fabric gives a very dense and smooth. So stitched upper edge of a leaf of white narcissus. The yellow is a reduction by 1 Biserko middle leaf.
d7ae01749e17 (612x640, 67Kb)
It is easy to wire sewn Ndebele art and mosaics. This is useful when sewing long leaves.
675afaebec1b (634x640, 70Kb)
c4f9ebb6b921 (640x636, 58Kb)
9d149f1f7d05 (640x630, 48Kb)
if you sew a small piece of paper Ndebele, the embroidered fabric on the hands can be vdet wire in extreme beaded rows and fix it on the decrease
6a1066d0440d (640x635, 81Kb)
You can sew on a wire and brick technique
b2d25dab4cfa (640x618, 70Kb)
Leaflet for other colors may be terminated by a wide margin. Tighten the wire, so that it fell exactly on the top edge of the last row of beads and sew across the top of each bead to the wire. Hide tails monofilament inside bead rows, moving from one to the other, before reaching the edge, so there was no risk of accidentally hook and pull the monofilament.
e5102ebc30c4 (626x640, 62Kb)
For yellow narcissus biserok dial 12 and the upper edge of the leaf to sew, subtracting 1 Biserko in a row. Sheet finish 2 Biserko. Turn the leaf upside down, attached to the left at the beginning of the ponytail and sew to the base of the leaf.
12 beads
10 beads
9 beads
8 beads
7 beads
5 beads
4 beads
Finishing the two beads and leaf curl wire tails previously adjusting embroidered cloth.
Total - leaf consists of 19 horizontal rows.
According to this schedule sew 6 petals
e33527f23bff (638x640, 121Kb)
We collect them on a wire
87790bcf346e (640x615, 98Kb)
Making Flower corolla: in the mosaic technique weave ribbon, closable in the ring, one edge in embroidered ruffles, another is reduced.
4eb6b72381cd (640x637, 111Kb)
From beads and beads collect serdtsevinku.
72887125020d (640x639, 77Kb)
Procrastination serdtsevinki not miss corolla center and between the beads and fishing line, spanning the last ring, at the same distance from each other
8c9bb83ae706 (630x640, 104Kb)
These wires are threaded between the beads and wire twist on the petals, located opposite. Firmly tighten the wire serdtsevinki and twist them to flower corolla tightly pressed to the petals. Then pull the wire tight which collected petals and wrap one end of the wire assembly exactly as tight as possible.
6e199b68f4c0 (640x627, 108Kb)
Now turn cocktail tubules. Flower turns very weighty and large, so the tube is necessary to strengthen and lengthen. Cut along the 2 tubes and insert them into the third. This is quite enough. Now twist the wire flower Bends in the loop, insert it in a long wire that is twisted too. compress the whole pliers. Long tolerate the wire into a tube
5710579f010b (640x616, 83Kb)
Firmly tightened, the wire bends up and over the punctured hole in the stem again miss inside.
d829dd62c2e1 (640x634, 48Kb)
Now you stalk tight, turn to turn, without overlaps, wrap the floss thread and fluff all with white glue. If there is a need - to paint with acrylic paint on top of the desired color.
5681cbad0305 (640x632, 102Kb)
Now turn green leaves. At daffodils are long and straight. Since they will be because of the great lengths they need heavy stitching on the twin wire. Incidentally, the delay tail when working better connect masking tape, so less will cling monofilament ...
56c754508ecc (640x580, 81Kb)
Sew the leaves of the wire barrels each other by a few centimeters. Wrapping them around the stem and sew the rest of the free edge, tightly pulling monofilament. Pierce in a couple of places stalk through, sew so that leaves to the stem.
54437d11b882 (640x634, 78Kb)

OPENWORK CARDIGANS

4:18:00 AM


>>> 
Irimed : as always, a few patterns that can help.
Grid with horizontal stripes
Setochka below without pico, too, is suitable.
Start from point A with a chain of air. etc. In the 1-st p. to tie up the air, the point of the initial river, in all traces. R. acc. Scheme of tying, inserting a hook for both threads of the loop or around the air. n. 
For 1 picot execute 4 air. and then back in the opposite direction from Art.with n. 1 Cpd. Art. (see the figure). The width and height between the arrows are 1 rapport. 
Patterns
It is very suitable shawl


Dimensions: 36/38 (40/42) 44/46   From here

Monday, January 15, 2018

LOVELY PONCHOS

3:10:00 PM
9.
9 (612x700, 547Kb)

10.
10 (662x700, 238Kb)

7.
7 (653x700, 404Kb)

8.
8 (700x617, 188Kb)